

Dilute white vinegar with water at a 1:1 ratio, test it on a small hidden patch, then apply and rinse. That fixes most mineral spots on the first or second try. If the haze doesn't budge after gentle escalation, you're likely looking at etching, and no amount of scrubbing will bring that glass back. At that point, a professional restoration job is the only real option.
TL;DR:
- Vinegar and water solutions can remove mineral deposits, but etched or bonded stains require professional restoration to avoid further damage.
- Regularly adjusting sprinkler heads, gutters, and downspouts prevents recurring water spots caused by mineral buildup on windows.
- Cold, overcast, and still weather conditions improve the effectiveness of DIY water spot removal, especially when cleaning acidic solutions.
- Homeowners often fail to recognize bonded or etched deposits early, which typically need expert polishing and specialized equipment to fully remove.
- Using harsh acids or abrasive tools on coated or tinted glass risks permanent damage, so careful testing and professional help are recommended when DIY fails.
Table of Contents
- What causes water spots on windows
- How do you remove water spots at home?
- How do you deal with stubborn, old water stains?
- How can you stop water spots coming back?
- When should you call a professional window cleaner?
- What tools and materials do you actually need?
- How do you apply and remove treatments without damaging the glass?
- Does weather affect how well water spot removal works?
- What professional window cleaners see that homeowners often miss
- Get a fixed quote for water spot removal in Bedfordshire, Buckinghamshire and Hertfordshire
- Sources
What causes water spots on windows
Every water spot starts the same way: water evaporates and leaves behind calcium and magnesium that were dissolved in it. The water disappears, the minerals don't. On homes, the usual culprits are lawn sprinklers throwing overspray onto ground-floor glass, rainwater splashing up off concrete or brick, and gutters or downspouts dribbling mineral-laden runoff down onto windows below. Vehicle owners see the same pattern after a wash left to air-dry in the sun, or from parking under a leaking gutter.
The distinction that actually matters is whether the deposit sits on the glass or has bonded to it. Fresh mineral film usually wipes away or softens under a damp cloth within a minute or two. Etched glass doesn't. Run a fingernail over it and you'll often feel a rough patch rather than a smooth surface, and the haze stays put no matter how hard you rub. That's a chemical reaction between minerals and the glass surface, not a coating you can lift off.
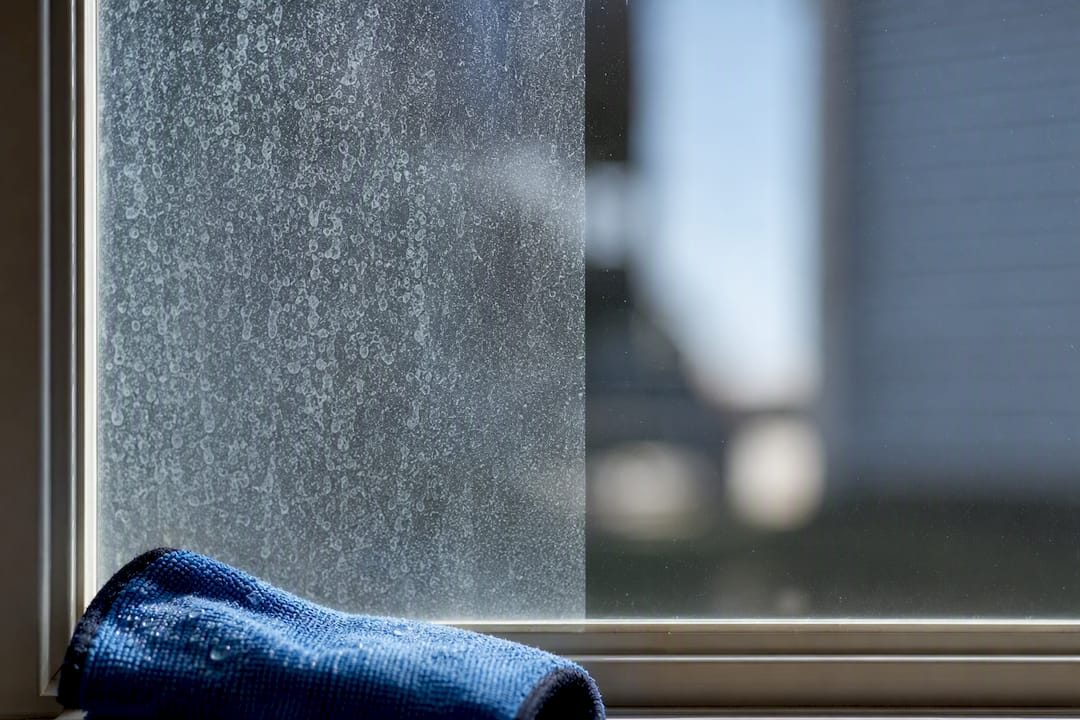
One more thing worth knowing before you reach for a cloth: tinted or aftermarket-coated glass reacts differently to both chemicals and scraping, so treat it more cautiously than plain glass from the start.
How do you remove water spots at home?
For light or recent spots, three household ingredients do most of the work: white vinegar, lemon juice, and bicarbonate of soda.
The core method:
- Rinse the glass first to clear away loose grit and dust. Skipping this step is the single biggest reason people scratch their own windows.
- Mix a 1:1 solution of white vinegar and water in a spray bottle. In hard-water areas, use distilled water for the mix so you're not reintroducing the same minerals you're trying to remove.
- Saturate the spotted area and leave it to dwell for five to ten minutes. Don't let it dry on the glass. If it starts evaporating before it's done its job, spray again.
- Wipe gently with a microfibre cloth or a non-scratch pad. Circular motions lift deposits better than straight-line wiping.
- Rinse thoroughly with clean water and dry immediately with a squeegee or fresh microfibre.
A few variations worth knowing:
- Add a few drops of dish soap to the vinegar mix for greasy runoff spots (common on windows near a driveway).
- Rub half a lemon directly on small, isolated spots. The citric acid works similarly to vinegar and leaves less smell.
- For light abrasion on stubborn film, make a bicarbonate of soda paste with a little water and work it in with a soft cloth before rinsing.
Always test a small area first, ideally in a corner that's easy to inspect but not prominently visible. Avoid working on hot, sun-warmed glass. Any acidic mix will dry too fast on hot glass and can leave its own residue behind, undoing the point of the exercise.
Pro Tip: Work in sections no bigger than a square foot at a time. It's tempting to spray the whole pane and start scrubbing, but the solution dries before you get to the far corners, and you end up doing double the work.
How do you deal with stubborn, old water stains?
When vinegar and lemon have been tried and the spots are still visible, you're into stronger territory, and this is where mistakes get expensive.
Citric-acid based products or purpose-made glass-safe water-spot removers are the next step up. Check the label carefully before buying anything. Dedicated acidic removers, often sitting around pH 4 to 5, dissolve mineral deposits effectively, but the same acidity that breaks down calcium can permanently cloud glass if it's misused, left on too long, or used on the wrong surface. Household vinegar stays a safer bet precisely because its acidity is predictable and mild by comparison.
Mechanical removal is the other lever, and it needs a careful order of operations:
- Start with a non-scratch pad and more dwell time before reaching for anything sharper.
- A razor blade held flat at roughly 45 degrees, used wet, can shift crusted mineral deposits on plain uncoated glass, but only after you've rinsed away every trace of grit.
- Never scrape tinted, film-coated, or aftermarket-treated glass. Razor blades will cut straight through window film and can scratch coated surfaces that look identical to plain glass until it's too late.
Pro Tip: If you're not certain whether a pane has film or a protective coating, assume it does. Run a test scrape in the least visible corner first, and stop immediately if you see any lifting or discolouration.
Around 25% to 30% of long-standing water spot cases that reach professional cleaners have already crossed into etched territory by the time the homeowner calls, based on how often restoration specialists describe deposits that have bonded to the glass rather than sitting on it. If your stronger DIY attempt isn't shifting the haze after two or three careful tries, stop. Continuing to scrub or apply harsher chemicals at that point usually makes the surface worse, not better.
How can you stop water spots coming back?
Cleaning the same window every few months gets old fast, and in most cases the fix isn't a better cleaner, it's removing the water source.
Walk your property and check where sprinkler heads are actually pointing. A head aimed slightly too high sends a fine mist onto glass every single watering cycle, and that repeated exposure is what builds visible deposits over weeks, not months. Adjusting irrigation direction solves more recurring spot problems than any cleaning product ever will. Leaking gutters and downspouts deserve the same attention. A drip running down brick onto a window sill for a season leaves a mineral trail that's far harder to shift than a single overspray incident.
For washing routines:
- Squeegee or towel-dry glass immediately after any wash rather than letting it air-dry.
- Use distilled water for a final rinse if your local supply is particularly hard.
- Test in an inconspicuous spot before applying any new product across a full window.
Longer-term, hydrophobic coatings, rain repellents, or a carnauba-based paste on vehicle glass all reduce how much water clings to the surface in the first place, which means less mineral residue when it evaporates. None of these make glass permanently spot-proof, but reapplied every few months, they cut cleaning frequency noticeably. A solar control or protective window film adds a further layer of protection on home glass, though it changes how you clean afterwards, so factor that in before fitting it.
When should you call a professional window cleaner?
If the glass still looks hazy after a careful, graduated DIY attempt, spending more time and product on it rarely helps. Repeated scrubbing on etched glass can actually widen the damaged area or introduce fresh scratches, which turns a hazy patch into a genuinely worse-looking window.
Signs you're dealing with bonded or etched deposits rather than surface film include a rough texture you can feel, haze that survives a five-minute vinegar soak, and marks that look worse in direct sunlight rather than better. Professional restoration typically uses specialist polishing compounds and variable-speed equipment that remove a microscopic layer of glass to bring back clarity. It's a controlled process, and it's genuinely difficult to replicate safely at home without the right tools.
Before hiring anyone, ask a few direct questions:
- Do they use glass-safe methods specifically, not generic exterior cleaning chemicals?
- Can they show before-and-after photos from similar jobs?
- Is pricing fixed after they see the glass, or will you get a vague estimate that changes on the day?
Pro Tip: Get a written or photo-based quote before any work starts. A company confident in its process won't mind sending one over.
What tools and materials do you actually need?
You don't need a van full of kit for most window water spot jobs. A short, well-chosen list covers nearly every scenario above.
For light spots: a spray bottle, white vinegar, distilled water where your supply is hard, a microfibre cloth, and a soft non-scratch scrubbing pad.
For stubborn deposits, add a glass-safe commercial remover with a clearly stated pH on the label, a plastic or rubber-edged squeegee for drying, and, only if you've confirmed the glass is plain and uncoated, a fresh razor blade with a holder designed for glass work rather than a bare utility blade.
A couple of items are easy to overlook but make a real difference. A soft-bristled detailing brush gets into window frames and rubber seals where grit collects before it scratches the glass during wiping. A second bucket of clean rinse water, kept separate from your cleaning solution bucket, stops you dragging dirty residue back across the pane you just cleaned. On vehicles, a clay bar designed for glass can lift bonded contaminants that a cloth alone won't shift, though it's a step most homeowners skip unless the spotting is severe.
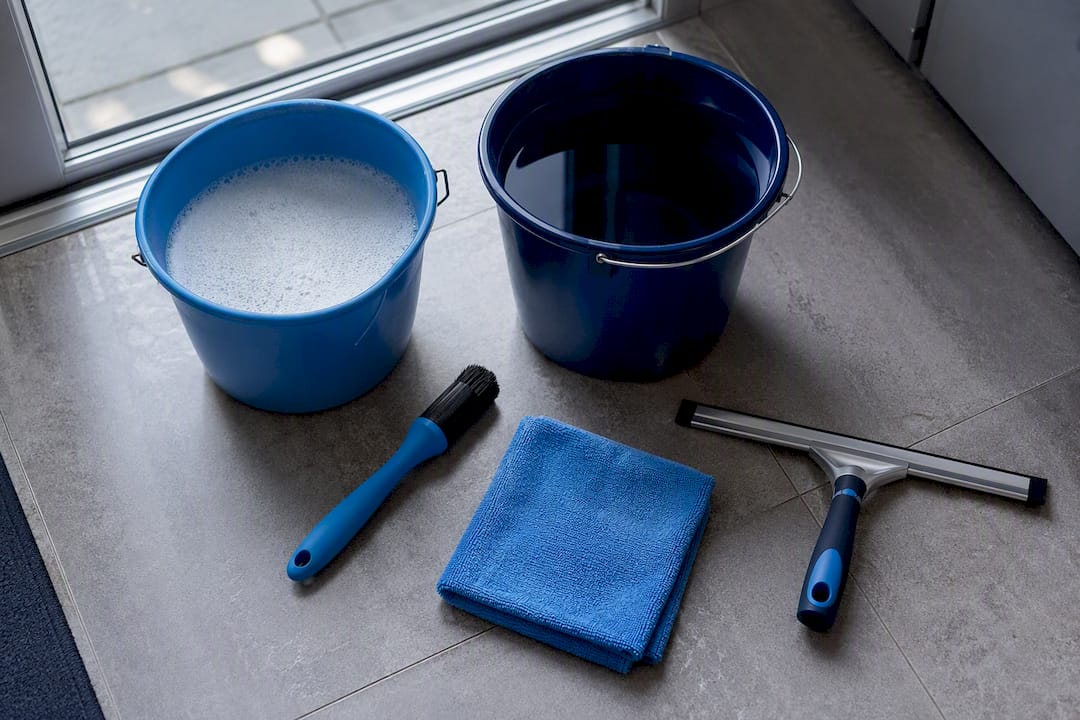
Skip anything abrasive that isn't specifically labelled safe for glass. Scouring pads, steel wool, and generic kitchen cleaners built for grease and grime tend to leave fine scratches that catch light at certain angles and are permanent once they're there.
How do you apply and remove treatments without damaging the glass?
The order you do things in matters as much as which product you choose. Rushing the sequence is where most avoidable damage happens.
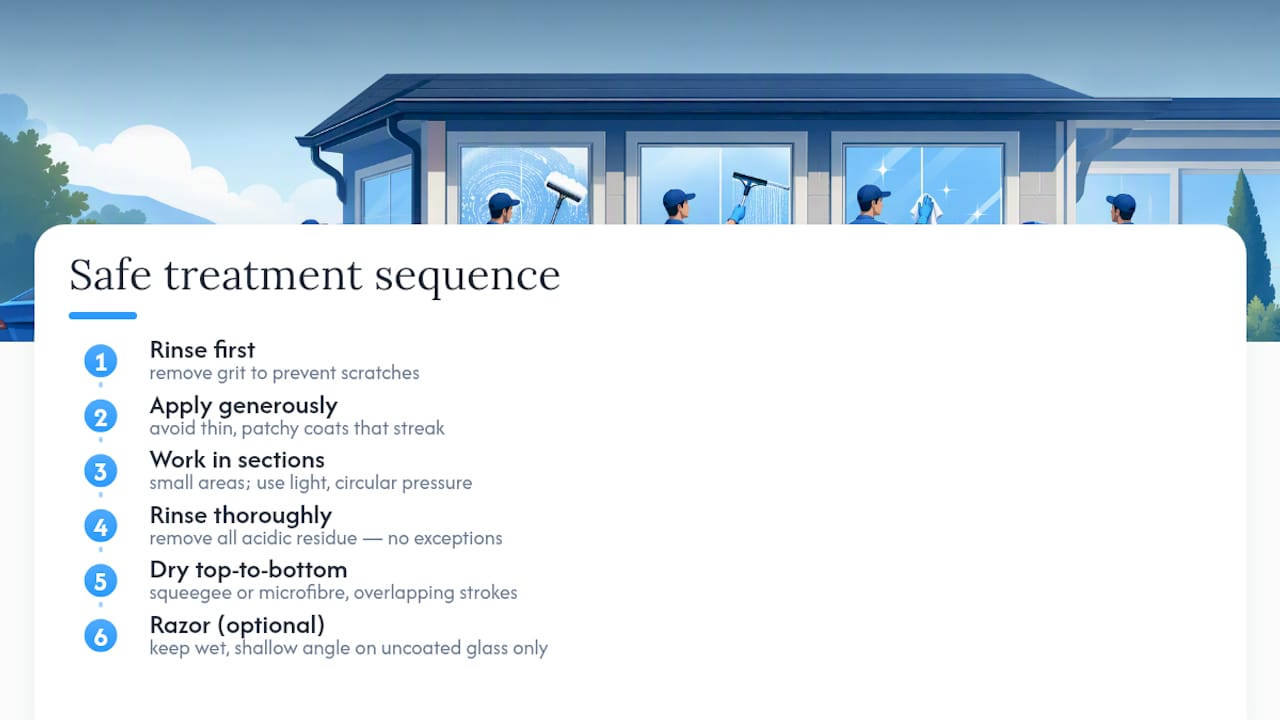
Always rinse before you apply anything. Grit sitting on the glass acts like sandpaper the moment you start wiping, and this single step prevents more scratches than any product choice does. Apply your chosen solution generously rather than sparingly. A thin, patchy coat dries unevenly and can leave streaks or fresh mineral residue behind, which defeats the purpose.
Work in manageable sections, especially with anything acidic. Trying to cover an entire patio door in one pass means the solution on the first section has already started drying before you've finished spraying the last, and dried acidic residue is its own cleaning problem. Use soft, circular motions with microfibre or a genuinely non-scratch pad, applying light, even pressure rather than pressing hard in one spot.
Rinsing off is not optional, even for products marketed as "no rinse". Any acidic residue left on glass keeps working after you've stopped scrubbing, and that's a common reason people report their spots "coming back" within days. Dry immediately afterwards with a squeegee or clean microfibre, working top to bottom in overlapping strokes. If you're using a razor blade on confirmed uncoated glass, keep the blade wet throughout and hold it at a shallow angle. A steep angle or a dry blade is how scratches happen, not how spots get removed.
Does weather affect how well water spot removal works?
Timing your cleaning session around the weather changes the result more than most people expect.
Hot, sun-warmed glass is the biggest problem. Any liquid you apply starts evaporating within seconds on glass that's been sitting in direct sun, which means your vinegar or citric solution never gets its full dwell time before it dries. Dried acidic residue on hot glass can leave faint new marks of its own, so you end up trading one spot pattern for another. Early morning or late afternoon, once direct sun has moved off the surface, gives you a working window where solutions stay wet long enough to actually dissolve mineral deposits rather than just sitting on top of them.
Cold weather brings a different issue. Very low temperatures slow the chemical reaction between vinegar or citric acid and mineral deposits, so dwell times that work fine in mild weather may need extending on a cold day. Wind matters too, mostly because it speeds up evaporation almost as much as direct sun does, particularly on exposed vehicle windows.
Humidity, oddly, works in your favour. Slightly damp air keeps your cleaning solution wet for longer, giving it more time to break down deposits before you wipe and rinse. If you have a choice, an overcast, mild, still day is close to ideal for tackling window water spots, whether that's a patio door or a car windscreen.
What professional window cleaners see that homeowners often miss
Judging by how often professional restoration jobs describe deposits that have already bonded to the glass, the pattern is consistent: homeowners typically try DIY methods for weeks or months before calling anyone, and by then the window has often crossed from removable film into genuine etching.
The most common mistake isn't choosing the wrong product, it's skipping the pre-rinse and going straight to scrubbing with whatever's on hand, often something abrasive that scratches while it cleans. The second is giving up on gentle methods too quickly and jumping straight to razor blades or harsh acids without testing first. Restoration tends to succeed when the surface still feels smooth to the touch, even if it looks hazy. When you can feel roughness under a fingernail, you're generally looking at a job for a specialist, and sometimes at a conversation about replacement rather than restoration.
— Mohammed
Get a fixed quote for water spot removal in Bedfordshire, Buckinghamshire and Hertfordshire
If your windows have gone past what vinegar and a squeegee can fix, or you'd simply rather not spend a Saturday testing razor blade angles, that's exactly when professional exterior cleaning services can help using soft washing and specialist glass-safe techniques suited to the surface in front of them.

The process is simple: send through a few photos or have a short call, and you get an exact, fixed price before any work starts. Look for services that provide clear pricing and before-and-after photos so you can see exactly what was achieved. For deposits that have gone beyond a weekend DIY fix, that direct route often costs less time and less money than another round of products that don't quite finish the job. If your windows need more than a vinegar wipe, get in touch with Axoracleaning for a fixed quote based on your photos.